In the Netherlands, the P2000 network is used by, amongst others, ambulances and fire brigades, to communicate about locations of emergencies. Formally, it is part of the broader C2000 network, which is used by the (military) police as well (but has an additional layer of encryption). What still amazes me is how easy it is to actually receive the messages yourself, too, using only a cheap Chinese 5-10 dollar USB DVB-T dongle. In this tutorial, I will show you how to build your own setup to receive P2000 messages in the Netherlands.
Requirements
Only a few things are required:
- A cheap Chinese DVB-T stick + antenna (such as this one). Most important is that it has the RTL2832U chipset, so that we can use it with rtl_fm.
- A Raspberry Pi (I used a Raspberry Pi 3). The RPi 3 has built-in Wi-Fi. In this tutorial, we will use it as a Wi-Fi hotspot, so use a USB Wi-Fi dongle if your RPi does not have it built in.
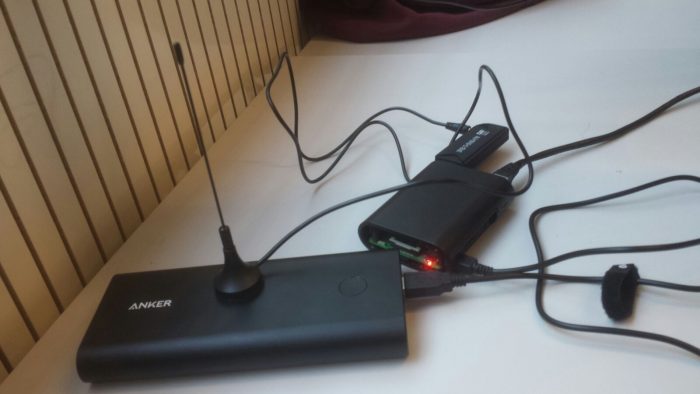
- A power source for the Raspberry Pi. I used an Anker powerbank here so that it is really portable.
The setup
Our setup simply consists of two parts: the Raspberry Pi, which will function as the core component that processes the incoming P2000 messages, and the USB DVB-T dongle + antenna, which we will tune to the right frequencies to receive the messages themselves.
Step 1: Setting up the Raspberry Pi
First, let’s set up the Raspberry Pi. In my own setup, I downloaded Raspbian Jessie Lite, which I wrote to the RPi’s SD card using the following command:
|
1 2 3 4 5 6 |
# WARNING: MAKE SURE TO HAVE THE RIGHT SD* DEVICE IN THE COMMAND BELOW!! azwaan@p2000-desktop:~/Downloads$ sudo dd bs=4M status=progress if=./2017-04-10-raspbian-jessie-lite.img of=/dev/sdb 1140850688 bytes (1.1 GB, 1.1 GiB) copied, 1.00282 s, 1.1 GB/s 309+1 records in 309+1 records out 1297862656 bytes (1.3 GB, 1.2 GiB) copied, 124.339 s, 10.4 MB/s |
Now, boot the RPi and make sure to properly secure it. That means, at least, that you should change the default password. If you are not sure what to do here, have look at this post which explains some easy security measures you can take.
Step 2: Installing rtl_sdr
Now, we will install the software we will use to work with the DVB-T dongle, rtl_sdr. Execute the following commands on your RPi to install it (source here):
|
1 2 3 4 5 6 7 8 9 10 11 12 13 14 15 16 17 18 19 |
# Install dependencies pi@raspberrypi:~ $ sudo apt-get install git-core pi@raspberrypi:~ $ sudo apt-get install git pi@raspberrypi:~ $ sudo apt-get install cmake pi@raspberrypi:~ $ sudo apt-get install libusb-1.0-0-dev pi@raspberrypi:~ $ sudo apt-get install build-essential # Clone, compile and install the rtl-sdr source pi@raspberrypi:~ $ git clone git://git.osmocom.org/rtl-sdr.git pi@raspberrypi:~ $ cd rtl-sdr/ pi@raspberrypi:~/rtl-sdr $ mkdir build pi@raspberrypi:~/rtl-sdr $ cd build pi@raspberrypi:~/rtl-sdr/build $ cmake ../ -DINSTALL_UDEV_RULES=ON pi@raspberrypi:~/rtl-sdr/build $ make pi@raspberrypi:~/rtl-sdr/build $ sudo make install pi@raspberrypi:~/rtl-sdr/build $ sudo ldconfig pi@raspberrypi:~/rtl-sdr/build $ cd ~ pi@raspberrypi:~ $ sudo cp ./rtl-sdr/rtl-sdr.rules /etc/udev/rules.d/ pi@raspberrypi:~ $ sudo reboot |
As explained here, one additional step is to blacklist some drivers that the RPi has installed by default (normally, the DVB-T stick is used as a television antenna, and the Raspberry Pi will automatically try to use it as such). This can be done by executing the following commands:
|
1 |
pi@raspberrypi:~ $ sudo nano /etc/modprobe.d/raspi-blacklist.conf |
This will open the raspi-blacklist.conf file in an editor. Now, add the following three lines to the file:
|
1 2 3 |
blacklist dvb_usb_rtl28xxu blacklist rtl2832 blacklist rtl2830 |
Press CTRL+O and CTRL+X to apply your changes and save the file. Now, reboot the RPi and check if the software runs properly:
|
1 2 3 |
pi@raspberrypi:~ $ sudo reboot ## let the Raspberry Pi reboot and execute the following command pi@raspberrypi:~ $ rtl_test |
Now, after the last command (rtl_test -t), you should get an output the looks like the following:
|
1 2 3 4 5 6 7 8 9 10 11 12 13 |
pi@raspberrypi:~ $ rtl_test Found 1 device(s): 0: Realtek, RTL2838UHIDIR, SN: 00000001 Using device 0: Generic RTL2832U OEM Found Fitipower FC0012 tuner Supported gain values (5): -9.9 -4.0 7.1 17.9 19.2 Sampling at 2048000 S/s. Info: This tool will continuously read from the device, and report if samples get lost. If you observe no further output, everything is fine. Reading samples in async mode... |
If you see a similar output after issuing the rtl_test command, you are good to go and can proceed to the next step! Otherwise, please use Google to troubleshoot the error message you are getting.
Step 3: Install multimon-ng to decode messages
Theoretically, we can now already receive P2000 messages. The thing is, we can not yet decode them so they would be worthless. Luckily, there is this article, which explains how to use a tool called multimon-ng to decode messages. Following the article, let’s install it:
|
1 2 3 4 5 6 7 8 |
pi@raspberrypi:~ $ cd ~/src/ pi@raspberrypi:~ $ git clone https://github.com/EliasOenal/multimonNG.git pi@raspberrypi:~ $ cd multimonNG pi@raspberrypi:~ $ mkdir build pi@raspberrypi:~ $ cd build pi@raspberrypi:~ $ qmake ../multimon-ng.pro pi@raspberrypi:~ $ make pi@raspberrypi:~ $ sudo make install |
Step 4: Test run!
Now that we have installed all the components, let’s try if it works! The command we will use to get the messages will consist of two parts: rtl_fm to actually receive the messages, which we will then pipe through to multimon-ng which automatically decodes the FLEX protocol for us.
In this case, we will use the parameters as suggested on this page, as they showed to ‘just work’ in the Amsterdam region.
|
1 2 3 4 5 6 7 8 9 10 11 12 13 14 15 16 17 18 19 20 21 22 |
pi@raspberrypi:~ $ sudo rtl_fm -f 169.65M -M fm -s 22050 -p 83 -g 30 | multimon-ng -a FLEX -t raw /dev/stdin multimon-ng (C) 1996/1997 by Tom Sailer HB9JNX/AE4WA (C) 2012-2014 by Elias Oenal available demodulators: POCSAG512 POCSAG1200 POCSAG2400 FLEX EAS UFSK1200 CLIPFSK FMSFSK AFSK1200 AFSK2400 AFSK2400_2 AFSK2400_3 HAPN4800 FSK9600 DTMF ZVEI1 ZVEI2 ZVEI3 DZVEI PZVEI EEA EIA CCIR MORSE_CW DUMPCSV SCOPE Enabled demodulators: FLEX Found 1 device(s): 0: Realtek, RTL2838UHIDIR, SN: 00000001 Using device 0: Generic RTL2832U OEM Found Fitipower FC0012 tuner Tuner gain set to 19.20 dB. Tuner error set to 83 ppm. Tuned to 169903575 Hz. Oversampling input by: 46x. Oversampling output by: 1x. Buffer size: 8.08ms Exact sample rate is: 1014300.020041 Hz Sampling at 1014300 S/s. Output at 22050 Hz. FLEX: 2017-04-20 11:03:29 1600/2/A 00.121 [000923123] UNK 00000000 00000000 00000000 00000000 00000000 00000000 00000000 00000000 FLEX: 2017-04-20 11:03:29 1600/2/A 00.121 [000923100] UNK 00000000 00000000 00000000 00000000 00000000 00000000 00000000 00000000 FLEX: 2017-04-20 11:03:39 1600/2/A 00.126 [001520029] ALN A2 Rodelaan 285 VBG 2272SG : 15129 Ritnr: 63019 |
If everything is right, your output should look a bit like the output above. As you can see, there are some ‘UNK‘ messages. I am not sure what they mean exactly, but for now let’s just ignore them. The others, like the ‘ALN‘ one here, show actual emergency messages sent to fire brigades, ambulances, etc.
Now that we have the messages, wouldn’t it be nice if to have a simple GUI through which we can see the messages?
Step 5: Displaying the messages
For this step, we will set up a really simple website through which we can see the messages. Let’s install Apache2 so that we can run a web server in the first place:
|
1 |
pi@raspberrypi:~ $ sudo apt-get install apache2 -y |
Now, let’s install php5 and browse to the root of the web server:
|
1 2 |
pi@raspberrypi:~ $ sudo apt-get install php5 -y pi@raspberrypi:~ $ cd /var/www/html |
We now want a directory where we will store the messages we will display. That consists of two parts: creating a directory to store the messages in a file, and actually creating the file itself. The first can be done using the following command:
|
1 |
pi@raspberrypi:/var/www/html $ sudo mkdir files |
Now that we have the directory, we will simply pipe the output of the commands used earlier to a text file in this directory (I know it’s dirty, but it does the job for a proof of concept):
|
1 2 |
pi@raspberrypi:/var/www/html $ sudo su root@raspberrypi:/var/www/html# rtl_fm -f 169.65M -M fm -s 22050 -p 83 -g 30 | multimon-ng -a FLEX -t raw /dev/stdin >> /var/www/html/files/messages.txt |
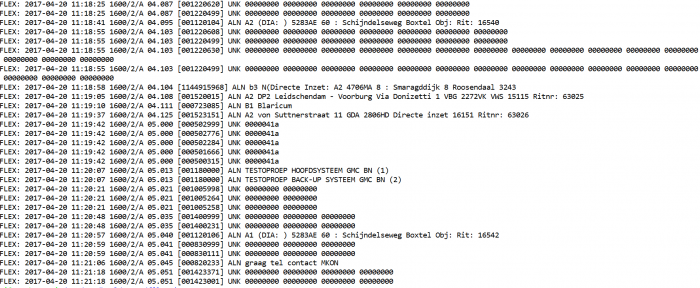
Now, each time a message comes in, it will be appended to the ‘messages.txt‘ file in ‘/var/www/html/files/‘. In the test run I did, it looked like the following after some time:
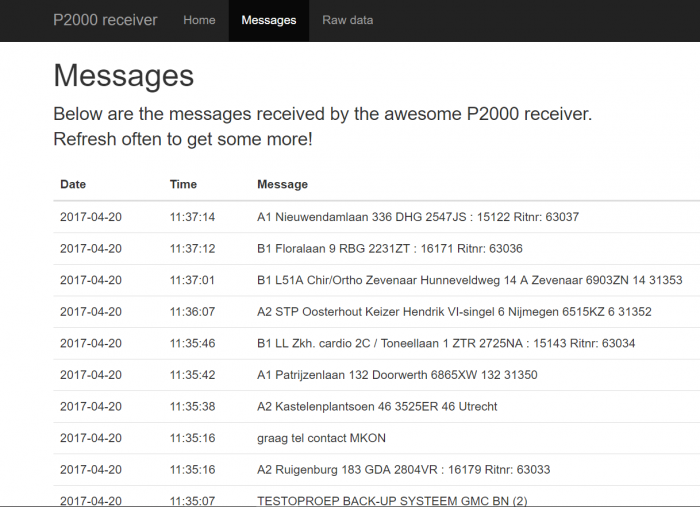
At my GitHub page, I published really simple source code that you can use as a starting point to view the message in a bootstrapped website. If you have properly configured your RPi as I did in this tutorial, and you use my GitHub example code, you should get the following if you browse to your RPi’s (local) IP address:
Step 6: Making it all portable
Wouldn’t it be great if we can make it portable? Let’s try.
In order to make this project fully portable, we need two things: a powerbank (such as the one I have), and a Wi-Fi hotspot running on the RPi to connect to when on the move (so that we can connect to it from a laptop and see the GUI we just set up). Skipping the first part (the powerbank), as it is obvious, let’s directly move on to setting up a hotspot.
Setting up the Wi-Fi hotspot is pretty easy. I would advise you to use the this tutorial, which explains it all pretty well.
After you successfully have a hotspot running on your RPi, simply take it all outside, go sit in a park, hook up the RPi to the powerbank, connect to the Wi-Fi hotspot and SSH into your RPi. Run the commands to sniff for P2000 messages and browse to its IP from your browser to see them. This is really all you need to see what’s happening in your neighborhood.
Step 6: Have fun! 🙂
Goedemorgen Auke, rare vraag maar kan jij mij de beschrijving in de Nederlandse taal leveren van “Creating a mobile P2000 receiver using a Raspberry Pi” . Artikel klinkt wat ik zoek, vooral het gedeelte website, maar mijn kennis technisch Engels is laag. Nu kan je translaten maar het resultaat daarvan is ook niet best.
Hoop dat je kan voldoen aan mijn verzoek waarvoor alvast dank, groet Ger
Hoi Ger, ik probeer mijn blog 100% Engels te houden. Wat ik je aanraad is even op de volgende website te kijken: https://nl.oneguyoneblog.com/2016/08/09/p2000-ontvangen-decoderen-raspberry-pi/. Deze tutorial beschrijft de basisstappen in het Nederlands. In plaats van alleen de “ruwe” data weer te geven op je scherm kun je ze ook wegschrijven naar een bestand. De code die ik op mijn Github-pagina heb staan kun je gebruiken om dat bestand uit te lezen en in “website”-vorm te tonen. Voor het installeren van een webserver op je Raspberry Pi kun je bijvoorbeeld deze tutorial gebruiken: http://www.huubmons.nl/multimedia/raspberry-pi/21-raspberry-pi/78-raspberry-pi-webserver. Als je daarna de bestanden van mijn Github-pagina in je /var/www/ map zet (en zoals in mijn beschrijving de ruwe data naar een bestand wegschrijft) zou het moeten werken.
Succes!
Cool, nice articel. I have ordered the recommended DVB-T dongle to try it myself.
Hi Auke,
any recommendations on best place to install antenna and/or to how to tune ppm/gain ?