Description
RU: Внедрение новейшей системы шифрования информации как всегда приносило множество проблем одной из известных служб FSI: они потеряли модуль, отвечающий за дешифрование информации. А информация уже была зашифрована! Ваша задача на сегодня: определить способ шифрования алгоритма и декодировать сообщение.
EN: Implementing of the latest encryption system as always brought a set of problems for one of the known FSI services: they have lost the module which is responsible for decoding information. And some information has been already ciphered! Your task for today: to define a cryptoalgorithm and decode the message.
h4ck1t{str(flag).upper()}
Solution
The attached ZIP archive contained an image called planet.png. It was a regular-looking image, so let’s look for any hidden stuff inside.
First, I looked for EXIF data using the exif command, which it did not contain. Then, I looked at any hidden message using the strings command, which did not show any useful ASCII strings.
My third step was to have a look at the pixels inside. I wrote a small Python script that iterates through the pixels and prints their RGB value. I decided to first look at the first 100 pixels (an arbitrary number I chose to keep the output small for now), to see if they contain some sort of a pattern.
|
1 2 3 4 5 6 7 8 9 10 11 12 13 |
from PIL import Image import random image = Image.open("planet.png") count = 0 for pixel in image.getdata(): print "Pixel {}: {}".format(count,pixel) if count == 100: break count += 1 |
Running the script, I got the following output:
|
1 2 3 4 5 6 7 8 9 10 11 12 13 14 15 16 17 18 19 20 21 22 23 24 25 26 27 28 29 30 31 32 33 34 35 36 37 38 39 40 41 42 43 44 45 46 47 48 49 50 51 52 53 54 55 56 57 58 59 60 61 62 63 64 65 66 67 68 69 70 71 72 73 74 75 76 77 78 79 80 81 82 83 84 85 86 87 88 89 90 91 92 93 94 95 96 97 98 99 100 101 102 |
root@kali:~/h4ck1tctf/Mozambique/solve# python testtest.py Pixel 0: (4, 5, 0) Pixel 1: (36, 27, 54) Pixel 2: (39, 30, 57) Pixel 3: (39, 29, 56) Pixel 4: (39, 29, 56) Pixel 5: (39, 29, 56) Pixel 6: (37, 28, 55) Pixel 7: (36, 27, 54) Pixel 8: (34, 24, 51) Pixel 9: (35, 26, 53) Pixel 10: (36, 27, 54) Pixel 11: (37, 28, 55) Pixel 12: (36, 27, 54) Pixel 13: (33, 27, 53) Pixel 14: (33, 27, 53) Pixel 15: (33, 27, 53) Pixel 16: (35, 26, 53) Pixel 17: (36, 27, 54) Pixel 18: (35, 26, 55) Pixel 19: (34, 28, 54) Pixel 20: (34, 28, 54) Pixel 21: (36, 27, 54) Pixel 22: (36, 27, 56) Pixel 23: (37, 28, 59) Pixel 24: (3, 4, 0) Pixel 25: (39, 28, 58) Pixel 26: (39, 28, 58) Pixel 27: (39, 28, 58) Pixel 28: (40, 29, 59) Pixel 29: (42, 29, 59) Pixel 30: (42, 29, 59) Pixel 31: (40, 29, 61) Pixel 32: (43, 29, 62) Pixel 33: (45, 30, 63) Pixel 34: (44, 29, 62) Pixel 35: (42, 28, 61) Pixel 36: (40, 29, 61) Pixel 37: (39, 28, 60) Pixel 38: (38, 27, 57) Pixel 39: (38, 27, 57) Pixel 40: (40, 27, 55) Pixel 41: (36, 26, 53) Pixel 42: (35, 26, 53) Pixel 43: (33, 27, 53) Pixel 44: (32, 26, 52) Pixel 45: (34, 25, 52) Pixel 46: (35, 25, 52) Pixel 47: (37, 27, 54) Pixel 48: (2, 2, 0) Pixel 49: (42, 29, 59) Pixel 50: (41, 28, 58) Pixel 51: (40, 27, 57) Pixel 52: (38, 27, 57) Pixel 53: (40, 27, 57) Pixel 54: (43, 28, 61) Pixel 55: (46, 29, 63) Pixel 56: (46, 31, 62) Pixel 57: (50, 30, 65) Pixel 58: (48, 28, 63) Pixel 59: (47, 27, 62) Pixel 60: (43, 28, 61) Pixel 61: (43, 28, 61) Pixel 62: (44, 30, 63) Pixel 63: (45, 30, 63) Pixel 64: (46, 30, 66) Pixel 65: (47, 31, 67) Pixel 66: (46, 32, 65) Pixel 67: (45, 31, 64) Pixel 68: (41, 30, 62) Pixel 69: (39, 28, 60) Pixel 70: (41, 30, 62) Pixel 71: (39, 30, 61) Pixel 72: (1, 1, 0) Pixel 73: (39, 29, 63) Pixel 74: (40, 31, 62) Pixel 75: (39, 32, 63) Pixel 76: (40, 33, 64) Pixel 77: (39, 34, 64) Pixel 78: (38, 33, 63) Pixel 79: (38, 33, 63) Pixel 80: (38, 33, 63) Pixel 81: (38, 33, 65) Pixel 82: (37, 34, 65) Pixel 83: (39, 36, 67) Pixel 84: (41, 38, 69) Pixel 85: (42, 39, 68) Pixel 86: (41, 38, 69) Pixel 87: (36, 35, 66) Pixel 88: (38, 35, 66) Pixel 89: (34, 33, 64) Pixel 90: (34, 33, 67) Pixel 91: (35, 34, 68) Pixel 92: (35, 34, 66) Pixel 93: (35, 34, 65) Pixel 94: (35, 36, 67) Pixel 95: (32, 35, 66) Pixel 96: (0, 0, 0) Pixel 97: (33, 33, 67) Pixel 98: (32, 32, 66) Pixel 99: (32, 32, 68) Pixel 100: (33, 33, 69) |
To me, that looked interesting. The first ‘outlier’ was at pixel #24, which showed an RGB value that was much lower than the surrounding pixels. Then, at pixel #48, the same seems to happen. The same applies to pixel #96. It seems that something is happening every 24 pixels.
After having a look at the image, I noticed a grid pattern, starting at the top left corner. I zoomed in on that part below:
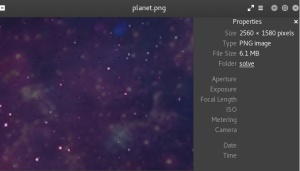
Might it be that these ‘dots’ have some meaning? At least it is too obvious to ignore it. Looking at the dots manually, it seems that there are 64 horizontally, and 64 vertically. We are thus dealing with a 64×64 grid here.
Using the same approach I used earlier to look at the pixels, I tweaked my script a little and printed every 24th pixel until I had 64 in a row. Then, I moved to the next row, which I assumed would be 24 pixels below as the vertical distance between the dots looked the same as the horizontal distance to me. I decided to also write them to a new image file to see what the output would be.
|
1 2 3 4 5 6 7 8 9 10 11 12 13 14 15 16 17 18 19 20 21 22 23 24 25 26 27 28 29 30 31 32 33 34 35 36 37 38 39 40 41 42 43 44 45 46 47 48 49 50 51 52 53 54 55 56 57 58 59 60 |
from PIL import Image import random flag = '' # Open the image img = Image.open('planet.png') # Convert the image into RGB img_pix = img.convert('RGB') # Define a counter to later keep track of how many pixels we processed on a row pixel_count = 0 # Create a list in which we will later store every 24th pixel interesting_pixels = [] def get_row(row_number,pixel_count): # Print which row is processed print "Getting row {}...".format(row_number) # We have 64 '24th pixels' or 'dots' on each horizontal row # Starting at 0, we want to read up until and including the 1512th pixel (63 * 24) for i in range(0,1513): # Get the current pixel pixel = img_pix.getpixel((row_number,i)) # If the current pixel is a '24th pixel', add it to our list if pixel_count % 24 == 0: print "Pixel {},{}: {}".format(pixel_count,row_number,pixel) # We store the value / 24 as that is the order in the output later on # e.g. the 48th pixel will be the 48/24 = 2nd pixel in the output # We need that order to be able to afterwards write the pixels to the output file in the right order interesting_pixels.append(((row_number/24,pixel_count/24),(pixel))) pixel_count+=1 # We have a grid of 64x64 pixels, so 64 rows of 64 pixels for i in range(0,64): # The dots are located 24 pixels from each other vertically, hence i*24 get_row(i*24,0) # Create a new image with the dimensions 64x64 im2 = Image.new('RGB',(64,64)) # Loop through the '24th pixels' we stored for pixel in interesting_pixels: # Get the pixel's coordinates coordinates = pixel[0] # Get the pixel's RGB values rgb = pixel[1] print coordinates,'-->',rgb # Write the pixel to the new image im2.putpixel(coordinates,rgb) # Write the image to a file im2.save('output.png') |
Now, let’s run the script:
|
1 |
root@kali:~/h4ck1tctf/Mozambique/solve# python pwner.py |
…and look at its output (./output.png):
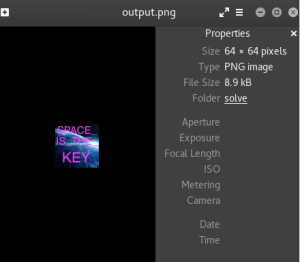
That’s it! Each ’24th pixel’ was one pixel of the 64×64 image that contains the flag. The flag is h4ck1t{SPACE_IS_THE_KEY}.